
Tutorial: How to make a Magic Circle with Crochet?
If you're interested in crocheting in the round, you've certainly heard of the magic circle, which is usually found in the abbreviated form « MC » in the patterns. This basic technique allows you to start a circular project without leaving a hole in the center.
The magic circle is very useful for crocheting in the round: it is widely used to make amigurumi (these small crocheted plush toys of Japanese origin), some granny squares (granny squares), some hats, or any other project that starts with a circle. Thanks to it, no more of that unsightly little hole that you find in the middle when you start a project with a few chain stitches closed in a classic ring.
At first, making a magic circle can seem a little tricky, especially if you're new to crochet. But don't worry: it's just a matter of getting the hang of it. In this special crochet tutorial for beginners, I'll explain step by step how to easily make your magic circle. Get your yarn and hook ready, and let's get started!
Crochet Magic Circle Tutorial, Step by Step
Creating the magic circle involves two main steps: first, form a loop with the yarn, then crochet the first row of stitches into that loop before tightening it. Let's look at this in more detail, step by step:
Step 1: Form the basic loop
Start by leaving a length of yarn about 5-7 cm free (this is the starting yarn that will be used to tighten the circle). Then wrap the yarn attached to the ball around two fingers of your left hand (index and middle fingers), forming a loop by crossing the yarn under your fingers. You should get a sort of "X" shape with the yarn. Hold this loop against your fingers with your thumb so it doesn't come undone and tuck the yarn between the last two fingers.

Pinch the thread between your fingers

Pass the wire through the back

And fold it down, forming an X

Pinch the thread between the last two fingers
Step 2: Insert the hook into the loop and make a chain stitch
Without releasing the loop, insert your hook under the loop (pass it under both strands of yarn). Yarn over the yarn attached to the ball and pull it through the loop. You now have a loop on your hook. To secure the magic ring, chain one with the yarn you just brought up. This will secure the loop and prevent it from unraveling.

Insert the hook under the first thread to catch the second thread

Pull the hook under the first thread

Rotate the hook to create a loop

Make a throw

Slide into the loop on the hook

Result of the magic circle
Step 3: Crochet the stitches into the loop
It's time to work the stitches of the first row directly into the large loop you created. Following the instructions in your pattern, crochet the required number of stitches into the loop. (For example, 6 single crochet stitches are often used to start a classic amigurumi.) Be sure to insert your hook through the loop, catching both strands of yarn (the loop yarn and the starting yarn at the same time) so that the circle forms correctly. Hold the base of the circle between the thumb and forefinger of your left hand while you crochet to keep the loop stable.

Insert the hook into the circle

Make a throw

Bring the hook back under the circle

Yarn over and pull through both loops on the hook

Continue sending messages

Result with 6ms
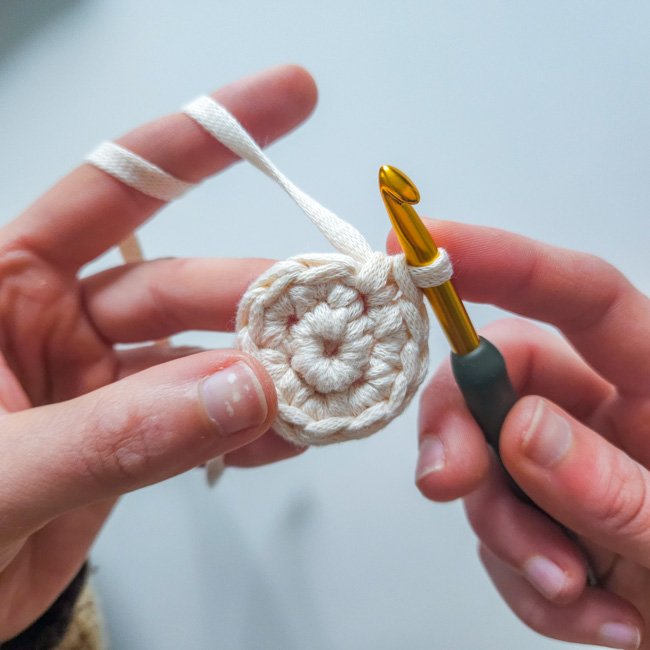
Step 4: Tighten the magic circle
Once you've crocheted all the stitches in the first row, you can close your magic circle. Gently release the loop from your fingers, then pull firmly (but without jerking) on the end of the starting yarn. The loop will magically tighten around the stitches you just created, completely closing the center of your work. Adjust the tension by pulling until the central hole disappears. You'll then have a neat circle of single crochet stitches, with no gap in the middle!

Pull on the thread to close the cm

Magic circle result with 6ms

Step 05
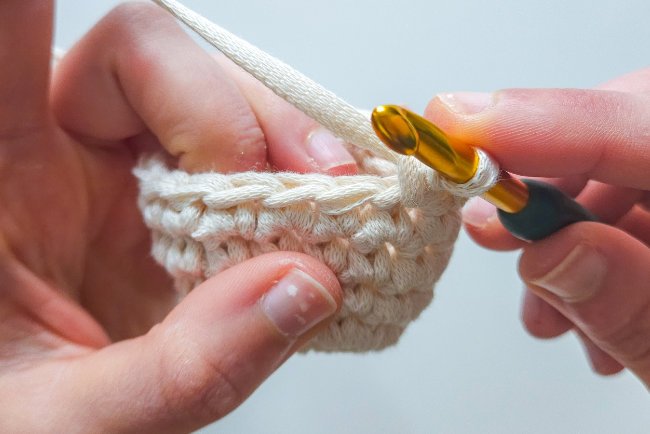
Step 5: Finish the first row
Depending on the needs of your project, you will either close this first row or continue in a spiral. If you are making a classic circular project (for example, a flat coaster, a granny square, or the beginning of a hat), you can close the row by making a slip stitch in the first stitch of the row.
However, for amigurumi or any spiral project, do not close the round: continue directly with the first stitch of the next round (remember to place a stitch marker to keep track of your rounds). In all cases, don't hesitate to count the number of stitches you have made in your magic circle to check that it matches the number expected by the pattern.
FAQ: Tips for successfully casting your magic circle
How much thread should be left at the beginning to make a magic circle?
Leave about 10 to 15 cm of yarn free before you begin. This will allow you to easily pull the yarn to tighten the circle, without the risk of it slipping out of the stitches.
How can I prevent the loop from unraveling while I'm crocheting?
While you crochet the stitches into the loop, hold the loop crossing firmly between your thumb and forefinger. This helps keep the loop stable until the end of the first row.
Is it necessary to crochet around a particular thread?
Yes, remember to crochet around the starting yarn (the "tail") and the yarn attached to the ball. If you forget to include the starting yarn, the magic circle won't tighten properly.
At what point should you pull on the thread to close the circle?
Wait until you have finished all the stitches in the row before pulling on the yarn. If you tighten the loop too soon, it may come undone or interfere with your work.
What if the loop doesn't tighten easily?
Never pull sharply! Pull gently, little by little, while holding the stitches with your other hand. The yarn will slide more easily without getting damaged.
Is it normal if I struggle at the beginning?
Absolutely! The magic circle requires a little practice. Practice with a thicker or lighter-colored thread to better see your movements, then go back to your usual thread.
Alternatives to the magic circle (easy version)
If you're really not comfortable with the magic circle, know that there are alternative techniques for starting a project in the round:
• The classic chain ring Chain 4, then slip stitch into the first chain stitch to form a small ring. Then crochet the first row of stitches inside this ring. This method is simple, but it leaves a small hole in the center of the work.
• The magic faux mesh (with 2 chain stitches): Make 2 chain stitches, then crochet all the stitches of the first row into the first stitch (the second from the hook). This way, your starting stitches form an almost closed circle, and by pulling on the starting yarn you can tighten the center a little. This variation doesn't completely close the hole, but it's smaller than with the 4-chain ring.
These alternatives can be helpful for starting out with circular crochet if you're having too much trouble with the magic ring. However, they don't give as neat a result: you'll always have a slight hole in the middle. The best approach is to persevere and practice until you master the magic ring: once you understand the technique, you won't be able to do without it!
Discover our other crochet tutorials:
How to make a slip stitch in crochet? Step-by-step tutorial
Learn the slip stitch (sl st), a basic crochet stitch. Ideal for closing a row or magic ring and creating a pretty finishing edge.

How to make a chain in crochet? Step-by-step tutorial
Beginner crochet tutorial: learn how to make the chain stitch (starting chain, abbreviated “ch”), an essential basic crochet stitch, explained step by step.
How to make a single crochet stitch? Step-by-step tutorial
Learn how to make a single crochet stitch, an essential basic crochet stitch for beginners. Step-by-step tutorial