
Tutorial: How to make a single crochet stitch?
Are you a beginner at crochet and you've heard about the single crochet stitch? Don't panic, it's a basic point Crochet for beginners that you'll quickly master. The single crochet stitch (called single crochet In English, abbreviated sc (in the patterns) is one of the first things to learn when you want to learn to crochet.
It's a simple but essential stitch, serving as the foundation for many projects. It's found everywhere: whether for making... amigurumi (these little crocheted plush toys from Japan), accessories or any project requiring a tight and regular basic crochet stitch, the single crochet stitch is THE technique to know.
In this tutorial, I'll show you step-by-step how to crochet a single crochet stitch. Follow the steps below: grab your yarn and hook, and let's master the single crochet technique together!
Crochet Single Stitch Tutorial, Step by Step
Before you begin, make sure you know how to do a basic chain (a series of chain stitches) or a Magic circle to start your project. If you haven't already, practice making a magic circle or a chain, because that's what we're going to crochet our single crochet stitches on.
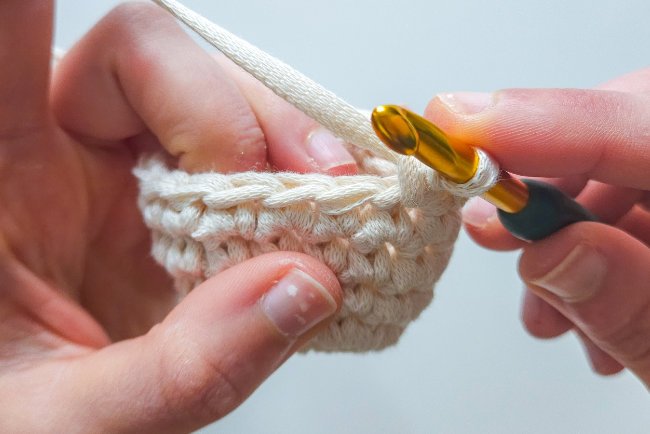
Step 1: Insert the hook into the stitch of the previous row
A single crochet stitch is made by crocheting into a stitch of the previous row (here, into a stitch of the magic ring you just made). To begin the first single crochet, insert your hook into the first stitch of the magic ring. Insert the hook through the stitch, passing under the two loops that form the small "V" of the stitch. (By inserting the hook under two loops, you ensure a strong stitch and a neater edge to your work.)

Beginning of the row

Insert the hook under the stitch of the previous row
Step 2: Make a throw and bring back a loop
Now that your hook is in the stitch, you need to catch the yarn to create a new loop.
Make a throw This means passing the yarn over your hook (from back to front). Then, with the hook, bring the yarn back through the stitch where you inserted the hook. Gently pull to pull the yarn through the base stitch. You have just created a new loop through the stitch of the previous row. At this point, you should have two loops on your hook: the initial loop (from your magic circle) and the loop you just brought back.

Make a throw

and pass through the first loop on the hook
Step 3: Complete the single crochet stitch
Now that your hook is in the stitch, you need to catch the yarn to create a new loop.
Make a throw This means passing the yarn over your hook (from back to front). Then, with the hook, bring the yarn back through the stitch where you inserted the hook. Gently pull to pull the yarn through the base stitch. You have just created a new loop through the stitch of the previous row. At this point, you should have two loops on your hook: the initial loop (from your magic circle) and the loop you just brought back.

Make a throw

and pass through the two loops on the hook
Step 4: Continue along the entire row
The single crochet you just made is finished. To continue the row, you simply repeat the same process in each subsequent stitch. So, insert the hook into the next stitch (right next to the stitch you just worked), always going under both loops. Then repeat: yarn over, pull a loop through the stitch (you now have two loops on the hook again), yarn over again, pull through both loops. You've made another single crochet. Continue in this way, stitch by stitch, until you reach the end of your row.
FAQ: Tips for a consistent tight stitch
How can I achieve consistent tension when making tight stitches?
Try to maintain consistent yarn tension throughout your project. If you crochet too loosely, you risk having uneven stitches and holes. If you crochet too tightly, your hook will have difficulty passing through the stitches. Relax, breathe, and find a smooth rhythm: with practice, your tension will naturally become more even.
What is the correct position for holding the hook and yarn?
Adopt a comfortable grip! Your yarn-holding hand should be able to slide easily for yarn overs, and your other hand should guide the hook smoothly. Every crocheter has their own method, but a stable and natural grip will help you better control your stitches, especially when you're starting out.
Why is it important to count your stitches?
Counting your stitches during each row is a great habit to adopt right from the start. This allows you to check that you haven't forgotten or added a stitch. For single crochet stitches, count the small "V"s visible at the top of your row: each V = 1 single crochet stitch. This is the secret to a straight and even piece of work!
What should I do if my yarn comes undone while I'm crocheting?
This happens especially with yarns that split easily. When you yarn over and pull the yarn through the stitch, make sure you catch all the yarn, not just part of it. Go slowly and maintain a good angle with your hook to avoid this problem. This is the key to neat and strong stitches.
What does a tight knit look like?
From above, a single crochet stitch forms a small "V". This V is made up of two loops: it's under these two loops that you'll need to insert your hook in the next row. Once you can easily identify these small, aligned Vs, you can easily count your stitches or locate where to crochet.
Where do you insert the hook to make a single crochet stitch?
Always insert your hook into the correct stitch; it's essential. Remember to insert your hook under both loops of the "V" in the stitch from the previous row. Otherwise, your work could become distorted or develop small holes.
Congratulations, you now know how to crochet a single crochet stitch like a pro! This basic crochet stitch holds no more secrets for you. The single crochet stitch will be useful in a multitude of projects, especially for compact projects and amigurumi crochet projects that require a firm stitch. Don't hesitate to practice more to gain confidence and consistency. The more you practice, the more even your tension will be, and the prettier your single crochet stitches will be.
Discover our other crochet tutorials:
How to make a slip stitch in crochet? Step-by-step tutorial
Learn the slip stitch (sl st), a basic crochet stitch. Ideal for closing a row or magic ring and creating a pretty finishing edge.

How to make a chain in crochet? Step-by-step tutorial
Beginner crochet tutorial: learn how to make the chain stitch (starting chain, abbreviated “ch”), an essential basic crochet stitch, explained step by step.

How to crochet a magic circle? Step-by-step tutorial
Learn how to make a magic crochet circle to easily begin crocheting in the round without a central hole. Step-by-step tutorial.